What is a thermoplastic line marking machine? It is equipment for heating or applying thermoplastic material to roads, parking areas, and other paved surfaces. Some setups use a separate preheater to melt solid material before an applicator places it. Others combine functions. The machine may use a screed or application shoe to form a defined line, while glass beads are distributed across the surface to improve visibility at night.
A consistent result depends on more than the machine. Material temperature, application speed, pavement condition, and bead coverage all matter. The surface should be clean and dry; otherwise, even a sharp-looking stripe may not bond well. That is easy to overlook. The process also takes practice, and settings that work on one site may need adjustment elsewhere.
A real expert quotation was not provided, so the following is an original illustrative line, not a verified statement from a real specialist. Fictional composite equipment specialist Maya Chen puts the practical point this way: “A good line starts with steady heat, but it earns its life through careful application.” This guide explains the machine’s main parts, how the marking process works, and what operators should check before work begins. It also considers limitations. Thermoplastic markings can be durable, but no equipment removes the need for sound surface preparation and regular inspection. The details are sometimes less tidy than a product brochure suggests.
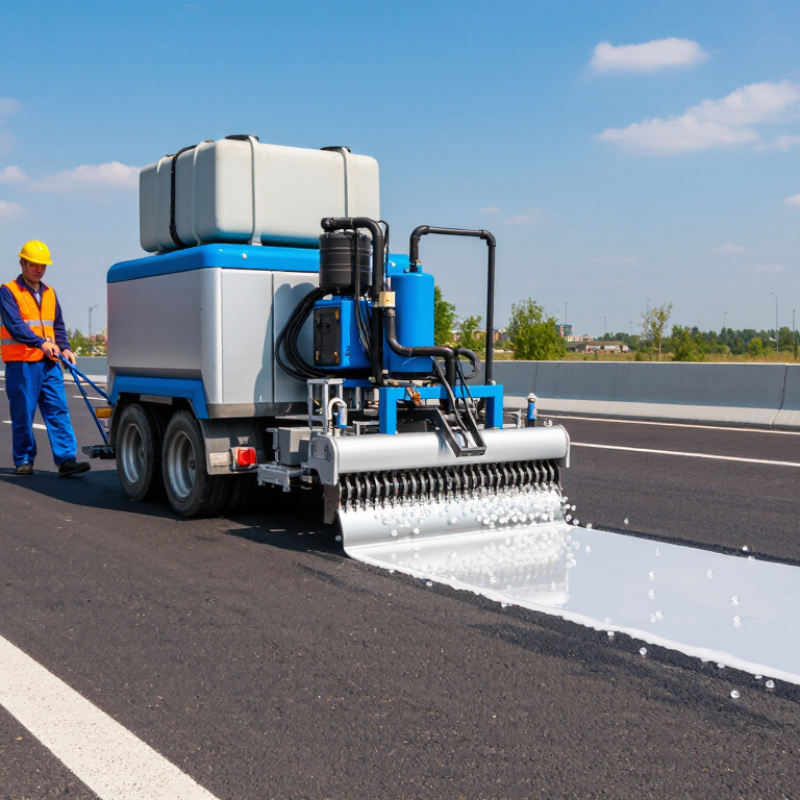
Definition and Purpose of a Thermoplastic Line Marking Machine
A thermoplastic line marking machine applies molten thermoplastic material to roads, car parks, and other paved surfaces. The material is heated in a preheater, then transferred to an applicator that forms lines through a screed, shoe, or spray system. As the material cools, it hardens into a durable marking. Some machines also distribute glass beads over the fresh line to improve visibility under headlights.
Its purpose is to create clear traffic guidance, including lane boundaries, stop lines, crossings, arrows, and parking bays. The operator controls the line’s position, width, and application rate while moving the machine at a steady pace. Small changes matter. A stop in movement can leave a thick patch, while excessive speed may produce a thin, uneven line. On a cool morning, the material may also behave differently than it does on a warm afternoon.
The machine does not guarantee a good result by itself. The pavement should be clean and dry, and the material must reach its specified working temperature. Operators check the feed, applicator height, and line width during the job, not only at the start. That takes practice. Even careful work may need adjustment when pavement texture or weather changes, so the finished marking should be inspected for consistent edges, thickness, and bead coverage.
What Is a Thermoplastic Line Marking Machine?
A thermoplastic line marking machine heats solid thermoplastic road-marking material until it is molten, then applies it to a prepared surface to create durable traffic lines and symbols.
Typical working temperatures are approximately 180–220°C. The exact temperature depends on the material formulation and product instructions.
Main Components and Their Functions
What Is a Thermoplastic Line Marking Machine?
Main Components and Their Functions
A thermoplastic line marking machine heats solid marking compound until it becomes a workable liquid. Its components control heating, mixing, and placement on pavement. The material kettle holds the compound, while a burner or electric heating system raises its temperature. An agitator keeps the mixture moving and helps reduce uneven heating. Temperature controls matter. A surface can look ready while material inside remains too cool.
From the kettle, molten material travels through a gated outlet or delivery channel to the application unit. A screed box, also called a shoe, shapes the compound into a line as the machine moves. Its opening helps determine line width and thickness. Small adjustments can change the result. Pavement texture and machine speed also affect how evenly the line forms, so operators often check a short test section before continuing.
Some machines include a glass bead dispenser. It drops reflective beads onto the fresh marking, where they can become partly embedded as the material cools. The chassis, wheels, and handles support steady movement, while controls regulate speed and material flow. Exact settings vary with the compound and site conditions. A useful reminder: the machine cannot compensate for a dirty or damp surface. Cleaning, calibration, and temperature checks still require attention, and rushed checks are easy to regret later.
What Is a Thermoplastic Line Marking Machine? - Main Components and Their Functions
| Component |
Main Function |
How It Works in Practice |
| Material kettle or hopper |
Holds thermoplastic marking material while it is heated and mixed. |
The capacity and design vary by machine. Material is added in solid form and becomes workable when heated to the specified application temperature. |
| Heating system |
Supplies heat to melt the thermoplastic material. |
Depending on the machine, heat may come from a gas burner, diesel burner, or electric system. Operators follow the material supplier’s temperature guidance. |
| Agitator or mixer |
Stirs the heated material to help maintain a consistent mixture. |
Mixing helps distribute heat and any pigments or fillers throughout the material and can reduce settling during operation. |
| Temperature monitoring and controls |
Allow the operator to monitor or regulate heating. |
A thermometer, temperature sensor, or controller may be fitted. Correct temperature helps the material flow and form a uniform marking without overheating it. |
| Flow gate or material outlet |
Controls the release of molten material from the kettle to the marking assembly. |
The operator opens or adjusts the outlet to supply material as the machine moves along the intended line. |
| Marking shoe, die, or screed box |
Shapes and deposits the molten material onto the road surface. |
The opening and setup help determine the line’s width and applied thickness. The assembly must be kept clean to support an even flow. |
| Glass bead dispenser |
Applies reflective glass beads to the freshly laid marking when fitted. |
Beads are placed on the surface while the thermoplastic is still hot so that they can become embedded and improve nighttime retroreflectivity. |
| Frame, wheels, and steering assembly |
Supports the machine and guides it along the marking path. |
On hand-pushed models, the operator provides the forward movement. Wheel alignment and steady steering help keep the line straight. |
| Handle and operator controls |
Let the operator guide the machine and manage its functions. |
Controls may include the material gate, burner, drive, or bead application, depending on the machine design. |
How the Machine Heats and Applies Thermoplastic Material
What Is a Thermoplastic Line Marking Machine?
How the Machine Heats and Applies Thermoplastic Material
A thermoplastic line marking machine heats solid compound in a kettle until it becomes a thick, pourable liquid. An agitator keeps the mixture moving, helping reduce scorching and uneven consistency. FHWA’s 2007 Pavement Marking Handbook gives about 400°F (204°C) as a typical application temperature. Actual settings depend on the material and project specification, so operators check both the thermometer and the flow. Heat needs patience. Too cool, and the line may drag or lose its shape; too hot, and the material can degrade.
Once molten, the compound travels through a heated outlet to a screed or application shoe. The shoe forms the line, while the machine’s speed helps control its thickness and edges. Glass beads are usually dropped onto the fresh surface so they become embedded and reflect headlights. NCHRP Report 759 examines pavement-marking performance under real-world conditions, a reminder that application quality is only part of the story; pavement texture and weather matter too. Real roads are less tidy. A clean-looking stripe at the kettle may still come out rough if the surface is damp, dusty, or uneven. Temperature logs help, but they cannot replace watching the material leave the shoe.
Common Machine Types and Operating Methods
What Is a Thermoplastic Line Marking Machine?
Common Machine Types and Operating Methods
Thermoplastic line marking machines melt solid material, then apply it as a durable road marking. Common types include hand-push screed units for short lines and crossings, extrusion machines for continuous, thicker lines, and spray systems for faster, thinner applications. A kettle or onboard heater keeps the compound workable; an applicator shapes the line, while a bead dispenser can add reflective glass beads. Operating temperature varies by formulation, so crews should follow its technical data sheet and monitor the material with a thermometer. Too cool, and it may not bond well. Too hot, and its properties can change.
The FHWA Pavement Marking Handbook gives thermoplastic an approximate three-to-six-year service-life range, depending on conditions and maintenance. Treat that as a planning estimate, not a promise: traffic, weather, surface preparation, and application thickness all matter. Before starting, crews typically clean and dry the pavement, check the kettle temperature, and test a short line for width and edge shape. Small details matter. I still see speed treated as the main measure, though a fast pass can leave uneven edges or inconsistent thickness.
Tips: Keep the applicator moving steadily, and check line width at several points. Record pavement and material temperatures. Pause if the surface is damp or dusty; the delay is frustrating, but poor adhesion is worse. After application, inspect bead coverage and allow the marking to set before reopening the area.
Typical Applications and Key Selection Factors
What Is a Thermoplastic Line Marking Machine?
Typical Applications and Key Selection Factors
A thermoplastic line marking machine heats solid marking material until it melts, then applies it as lines or symbols. After cooling, the material forms a firm road surface marking. These machines are commonly used for road edges, pedestrian crossings, parking bays, and warehouse lanes. A busy site may need broad, continuous lines; a small car park may need precise turns and short markings. The right machine depends on the work, not just its advertised output.
Check the surface, marking width, daily workload, and heating method before choosing. Uneven pavement can affect line consistency, while damp or cold conditions may slow application and cooling. Confirm that the machine suits the material you plan to use. Consider how easily operators can control flow, maintain temperature, and clean the kettle. Safety matters too: heated material can cause burns, so clear controls and suitable protective equipment are essential. Specifications help, but they cannot predict every site condition.
Tips: Test a short line on the actual surface. Watch for uneven edges, poor adhesion, or slow cooling. These details can reveal problems early. Keep a maintenance log, even if it seems fussy; small temperature errors can quietly reduce finish quality.
Conclusion
A thermoplastic line marking machine is equipment designed to heat solid thermoplastic material until it becomes workable, then apply it to a surface to create durable lines and symbols. Its main components commonly include a heating vessel, burner or heating system, temperature controls, an application mechanism, and wheels or handles for movement. Each part helps manage material temperature, flow, placement, and operation.
During use, the material is heated and mixed until it reaches a suitable consistency, then guided through a die, shoe, or other applicator onto the prepared surface, where it cools and hardens. Machines may be hand-pushed, ride-on, or mounted on vehicles, with operating methods suited to different project sizes and layouts. Typical applications include marking roads, parking areas, industrial floors, and other paved spaces. When selecting a machine, consider the marking area, required line width, output capacity, heating method, mobility, ease of cleaning, and operator needs.